About this deal
Alternatively, you can also use the adapter to bypass the Starlink router and set up a connection with a third-party router.
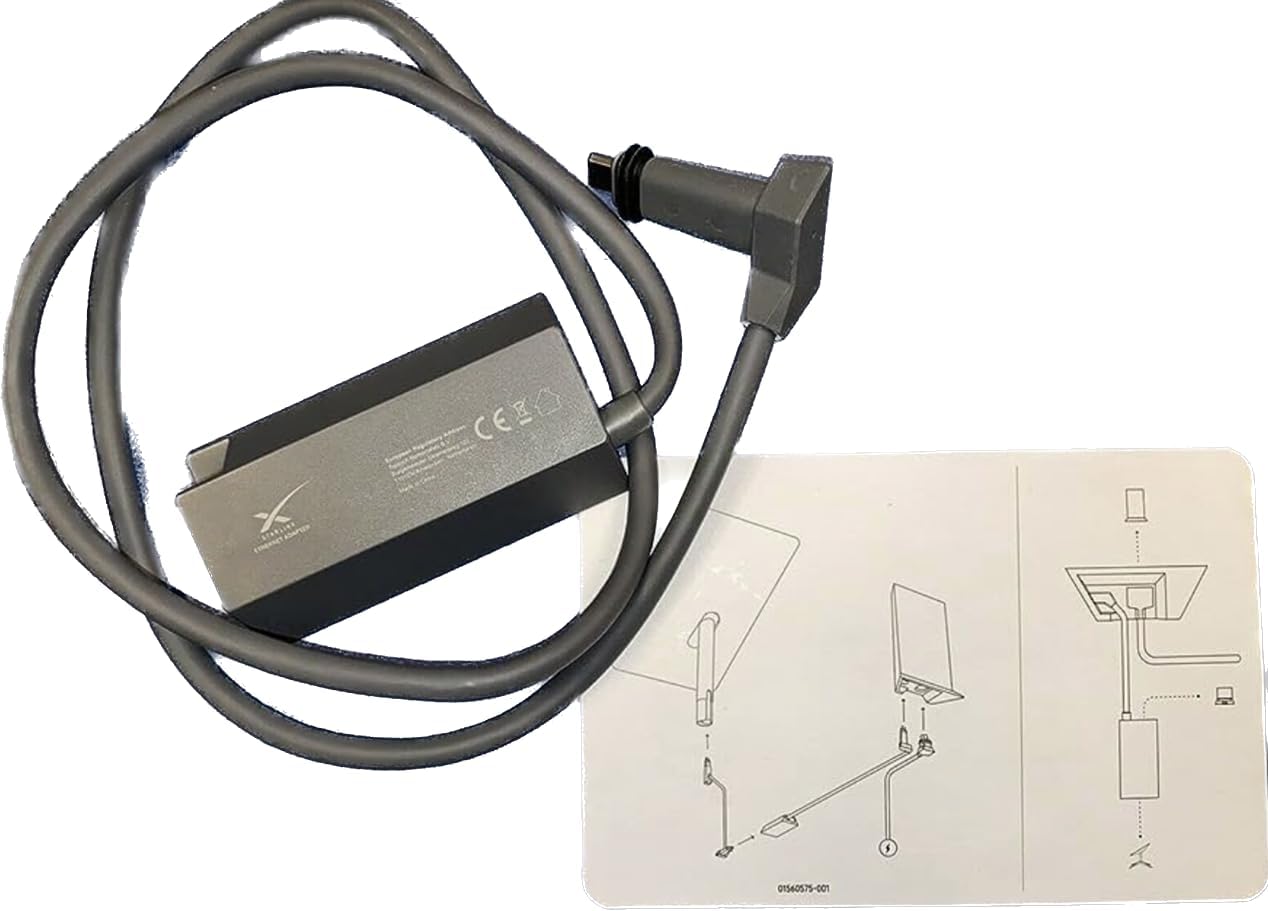
For these problems, you'll need to turn to the accessories sold through the Starlink shop , which is only available to Starlink customers. In addition to dish mounts and replacement cables, the company store offers accessories for networking your whole home, whether by adding wired devices or extending your Wi-Fi coverage with a compatible third-party router. Being located in Germany, where speed issues aren’t really that prevalent, using the Ethernet Adapter has mostly been beneficial in reducing my ping when gaming. Hi there, thanks for a very helpful blog. I have a question regarding my existing wired home network. I had no problem setting up the Ethernet adapter, and restarting the starlink router and having successful connection to the existing network. However eventually (typically a day or so) the connection is lost to the network (while the starlink hub still works fine) and I have to restart the starlink hub to reconnect the network. The Ethernet adapter connects to a D-link switch, where cables run out to sensors, an AirPort Extreme base station which serves as Time Machine for a couple computers with a usb cable to a printer so it can be accessed wirelessly, and a cable also runs from the d-link switch to separate building where there is an apple wireless hub in what I think is extension mode for wireless and also Ethernet connections to sensors, solar panels and a computer. Sounds like a complex setup, but it has worked fine with our old router on dsl, and I simply switched from the old router to the starlink hub through Ethernet adapter. Where do you think the culprit for dropped connection may be? Is it starlink hub, d-link Ethernet switch, having other wireless hubs in bridge or extension mode on the the local Ethernet network? Would be delighted to hear any suggestions. Thanks! Reply Once it's all done, you can attach the Pivot Mount to the freshly installed Flashing Mount, and proceed to set up your rooftop Starlink dish. An Ethernet adapter that enables a wired connection to a device can offer several advantages over a traditional Wi-Fi connection:If you need to elevate your Starlink dish, a number of mounting options are available to help. Whether you want to put your dish on your roof, on the side of your house, or even in the middle of a field, here are the accessories that let you do it. Starlink Pivot Mount While most people likely don’t connect to the internet via an ethernet cable, it did not take up that much space, to begin with. It does feel like that SpaceX simply wanted to find another way to monetize its loyal user base. First and foremost, I think that Starlink’s Ethernet Adapter does what it’s supposed to. Starlink’s products often have an Apple feel to them in that they’re beautifully designed and easy to use. With that said, I do question the motive behind removing the ethernet port from the Gen1 hardware set. Step 1 – Unplug the Starlink router AC power cord from the wall. You will want the dish and router turned off while we reconfigure the cables.
Instead of simply drilling into the roof, the Flashing Mount's setup is a bit more involved. It requires you to cut away some of your roof using a provided template and a utility knife, pry up the surrounding shingles a bit, and then screw and caulk the mount into position. It's a more invasive process, but that's just the reality of some roofing materials. The Starlink Mesh Wi-Fi Router also has the necessary connection to connect the Ethernet Adapter to your mesh node, giving you a wired port wherever you need it in the house. The Starlink Ethernet Adapter supports up to 1 Gbps for the LAN interface. Like I mentioned before, you get a single Ethernet port. Besides the Ethernet port, there are two other connectors. There is a Starlink connector on one end that plugs into the router, and another Starlink connector that accepts the cable from the dish. Here are some additional specs: After you've positioned the mesh node, plug it into a power outlet. From there, it's merely a matter of opening the Starlink app, waiting for the app to recognize the new node, and then following the onscreen instructions to pair the node with your existing Wi-Fi network. If you need to extend your wireless coverage farther, repeat the process with a second or third mesh node. So you've got your Starlink satellite internet service up and running. But what if you want to add a different router to your home setup? What if the included Wi-Fi router isn't delivering the sort of coverage you need?
However, keep in mind that Starlink’s latency is substantially better compared to GEO satellite internet services like HughesNet or ViaSat. In a smart touch, the kit also comes with an over-the-shoulder carry bag for the Starlink dish, to make it easier to carry the dish safely up a ladder. Starlink has their own case, called the Starlink Travel Case. It’s a bit cheaper than some of the aftermarket cases, and is specifically designed for Starlink. To get Starlink internet in your home, you need to mount the dish somewhere with a clear view of the sky. The setup process includes scanning the overhead area with your smartphone camera to identify any possible obstructions, and it's during this process that you may find yourself unable to get that clear skyward view.
 Great Deal